Updated on: January 7, 2026
Reading Time: 6 minutes
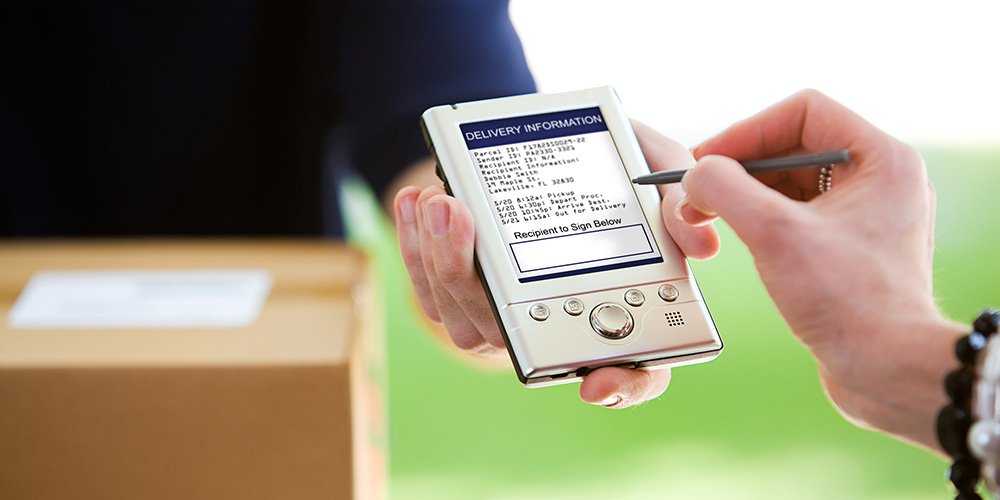
If you are into the logistics business, then Proof of Delivery becomes a crucial part of the whole delivery system. POD is a significant part of the delivery process as it establishes that the package has been delivered to the customer and acts like a receipt that proves that the delivery has been made.
Proof of Delivery consists of a written acknowledgment of having received the order of a specific amount of money on a specific date and time, the name of the person who has received the product, and other shipping details. They are basically an official document where the customer confirms the receipt of the order or parcel.
In today’s competitive logistics landscape, customer expectations continue to evolve. Businesses need to provide transparency and accountability throughout the entire delivery process. Traditional paper-based PODs, while functional, often lead to delays, lost documentation, and administrative overhead. Moreover, with the increasing emphasis on digital transformation across industries in 2026, electronic solutions have become the standard rather than the exception.
Good communication is essential for the success of the business. And in the logistics industry, customers expect to know where their orders are. With emerging technologies and innovations, we at Zeo Route tried to enhance the old methodology of the PODs. We came up with the E-PODs or the Electronic Proof of Delivery in our app. An E-POD is a digital format of a traditional paper delivery order or delivery note. They present an efficient, modern approach to distribution that allows transport companies to provide better customer service throughout the delivery process.
Electronic Proof of Delivery offers numerous advantages over traditional paper-based systems. It eliminates the risk of lost paperwork, provides instant verification, reduces administrative costs, and enables real-time tracking of delivery confirmations. For businesses managing multiple delivery routes, this digital approach streamlines operations and provides valuable data insights that can help optimize future deliveries.
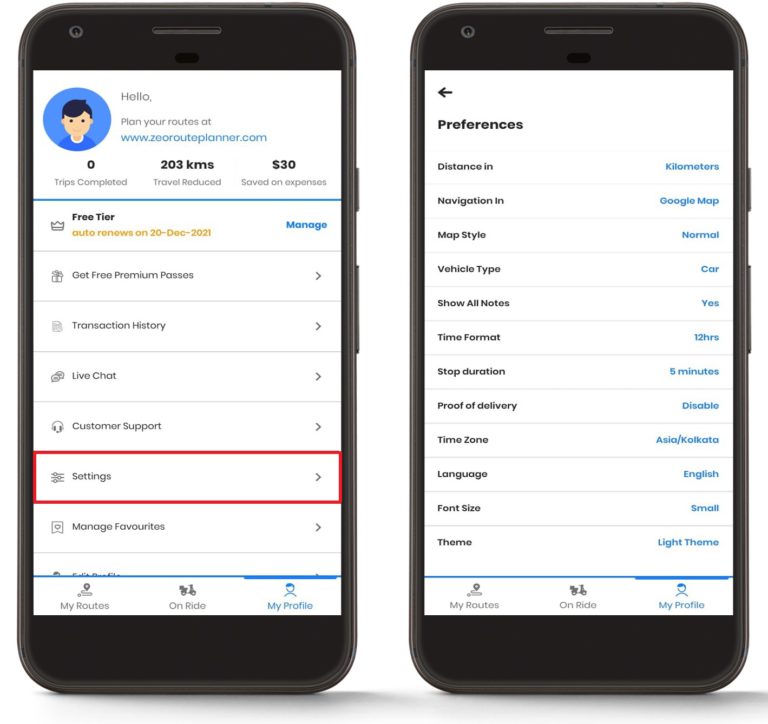
Steps to enable Proof of Delivery in Zeo Route Planner
Just follow these simple steps to enable the Proof of Delivery in the Zeo Route Planner App
- Open the Zeo Route Planner App and head towards the My Profile section.
- Then press on the Settings tab to open the list of Preferences.
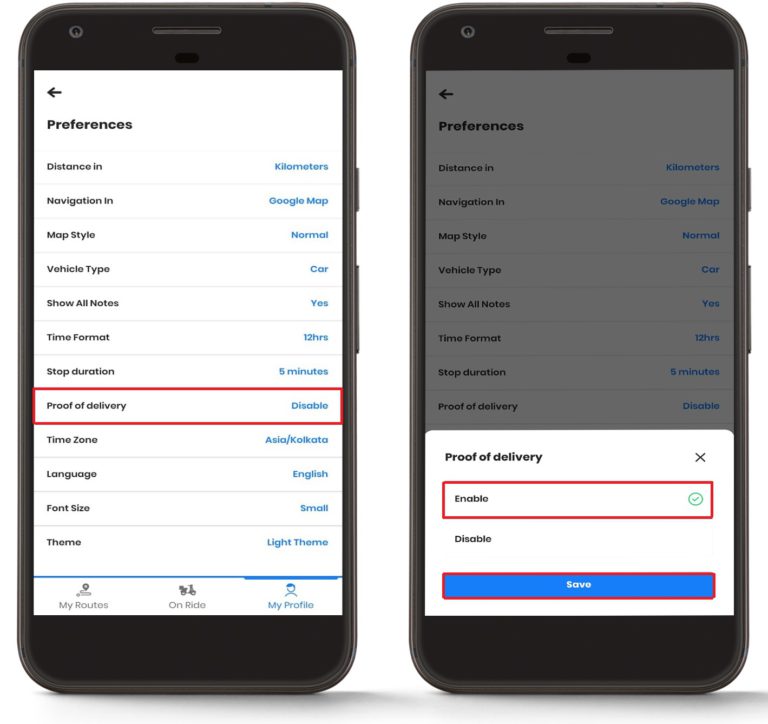
- Then press on the Proof of delivery tab. A popup will show up.
- Press the Enable option and then press the Save button.
Once you’ve enabled the Proof of Delivery feature, it will automatically apply to all your future routes. This one-time setup ensures that every delivery you make can be properly documented and verified, providing peace of mind for both you and your customers.
- Now head to the My Routes section and press on Add New Route, and start importing all the addresses. Zeo Route Planner lets you import the address through the spreadsheet, Bar/QR code, image capture, and manual typing. After adding your addresses, press the Save and Optimize button to optimize all the routes.
- Now you can start the delivery process by pressing the Navigation button. After reaching your destination, press the Done button.
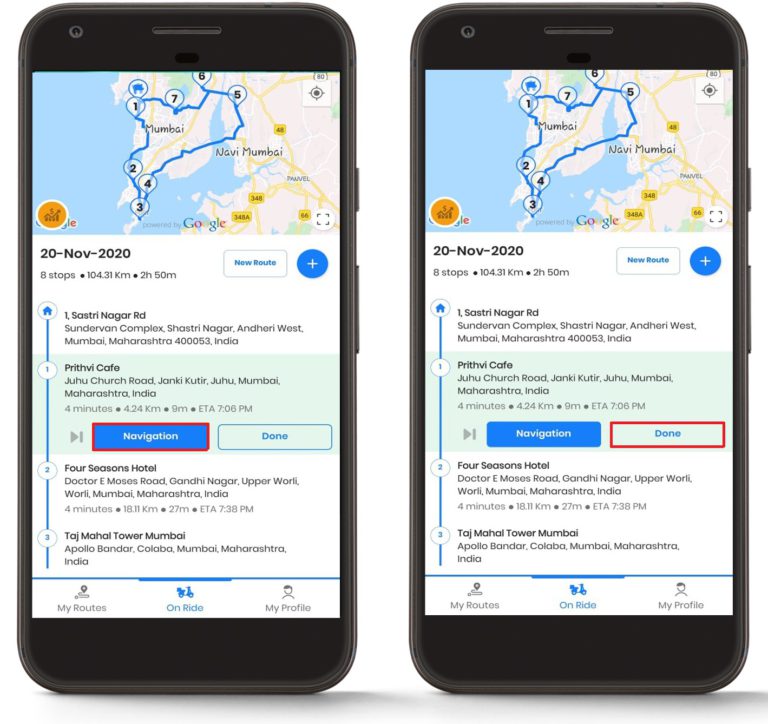
- As soon as you press the Done button, you will get a popup showing you two options, Validate over Signature and Validate over Photograph.
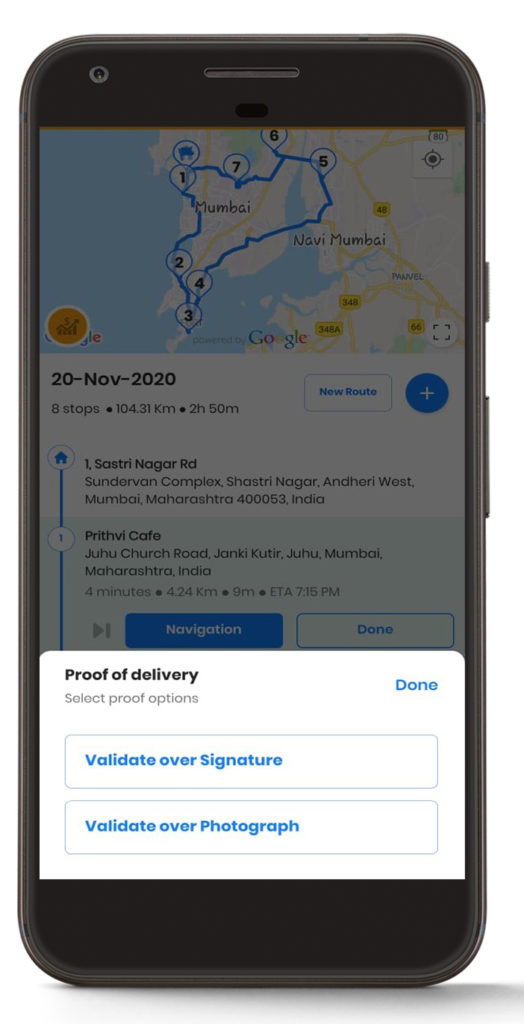
The choice between signature and photograph validation depends on your business requirements and customer preferences. Signature validation is ideal for formal deliveries where customer acknowledgment is essential, while photograph validation works well for package deliveries where visual confirmation of the delivered item is more important.
- If you choose the Validate over Signature option, a new popup will open up with a blank space where you can capture the customer’s signature. You can tell the customer to use their fingers as a stylus and sign on to that blank space; after taking the signature, press on Mark as Completed to complete the delivery.
- You can also use the Clear button to clear the blank space if the signature is not appropriate.
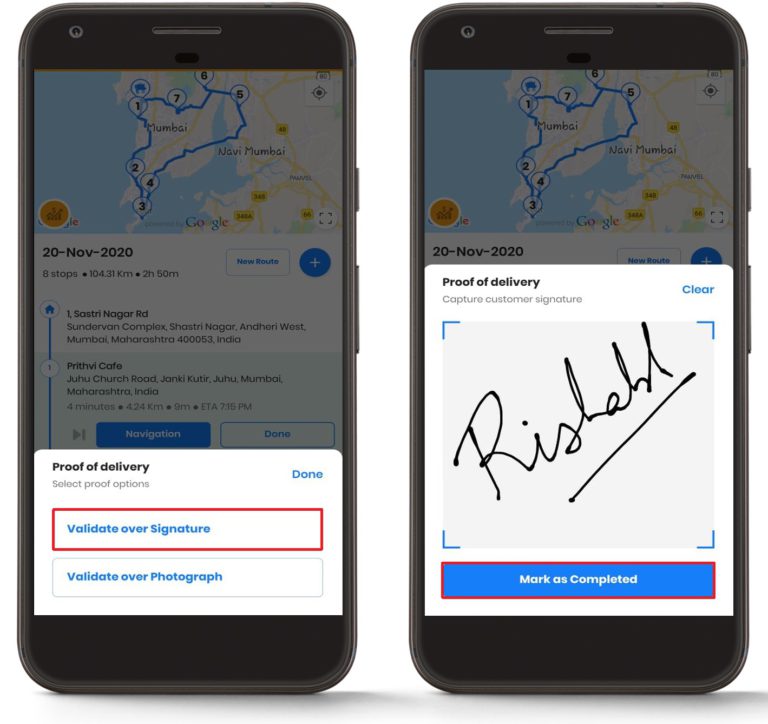
The signature capture feature is designed to work seamlessly on all smartphone screens. The interface is responsive and captures signatures clearly, ensuring that the proof of delivery is legible and legally valid. This digital signature is automatically timestamped and location-tagged for additional verification.
increase fuel savings
Save 2 Hours on Deliveries, Everyday!
Optimize routes with our algorithm, reducing travel time and costs efficiently.
Get Started for Free
- If you choose the Validate over Photograph option, then your camera will open up, and you can take the package’s image. After taking the package photograph, you can press the Mark as Complete button to finish the delivery process.
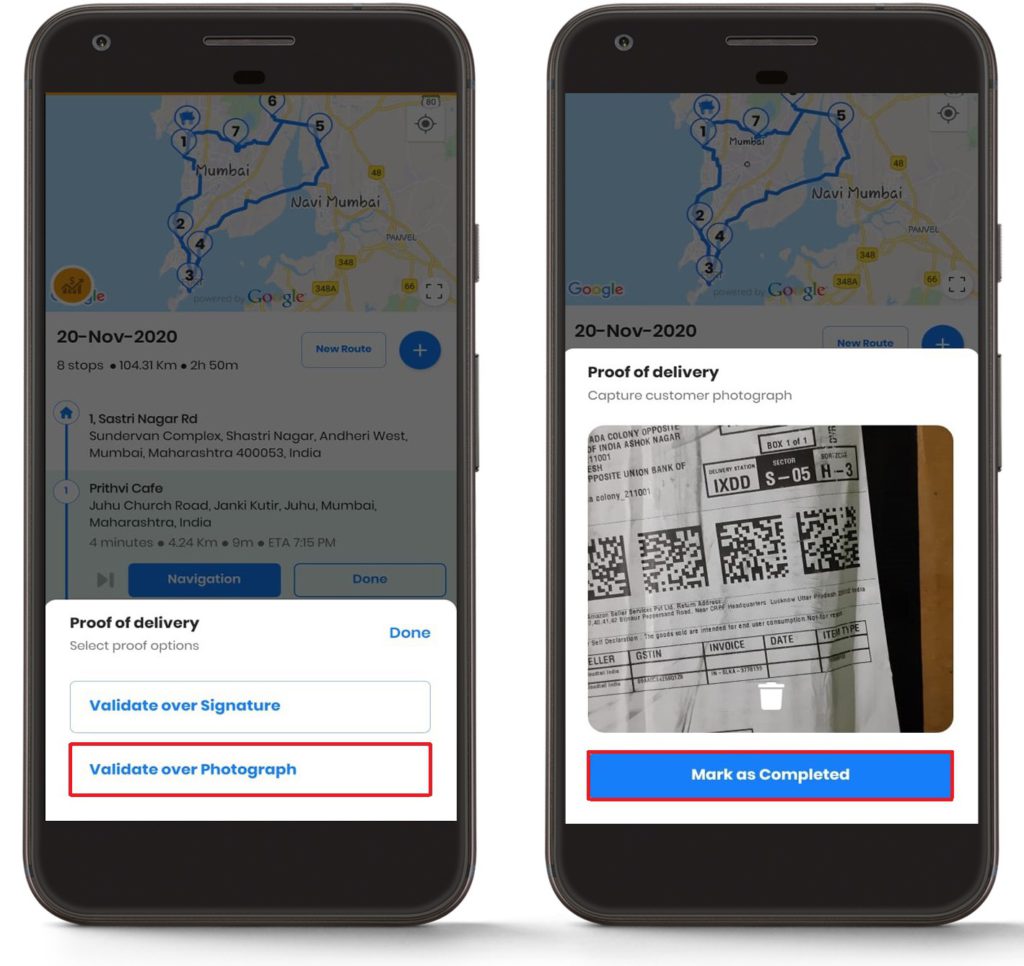
When using photograph validation, it’s recommended to capture clear images that show the delivered package in context with the delivery location. This might include the package placed at the customer’s doorstep, handed to the recipient, or positioned at the designated delivery area. The photograph serves as visual evidence that the delivery was completed successfully.
- If at any point if you want to see the Proof of Delivery for a particular stop, press the Show button on the On-Ride section. You will see the list of completed addresses.
- Press on the Tick icon, which you can see before the address.
- As soon as you press on the Tick icon, you will see the Proof of Delivery you have taken in the delivery process.
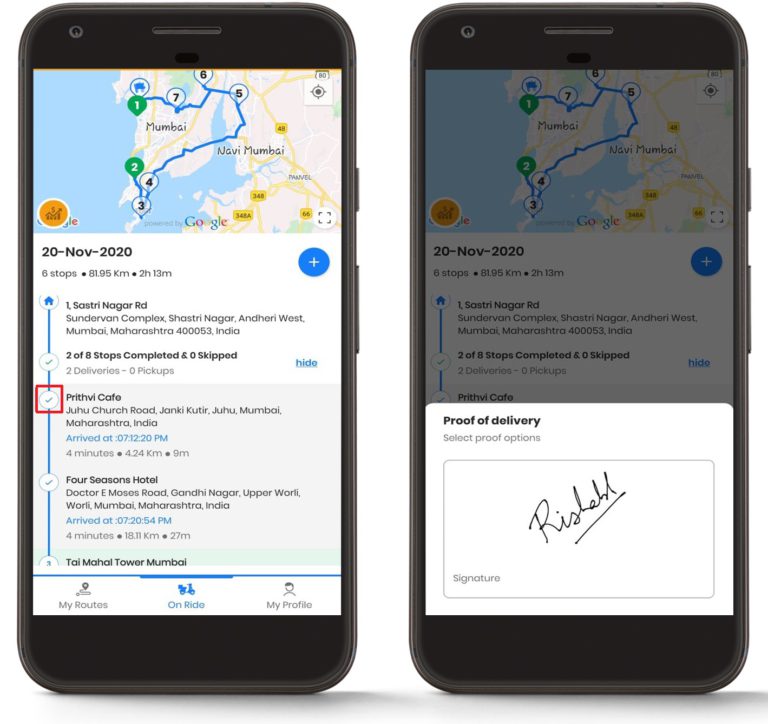
The ability to instantly review proof of delivery records is particularly valuable when dealing with customer inquiries or disputes. Having immediate access to signatures or photographs helps resolve delivery-related questions quickly and maintains customer satisfaction.
Frequently Asked Questions
1. Can I use both signature and photograph validation for the same delivery?
Currently, Zeo Route Planner allows you to choose one validation method per delivery. You’ll need to select either signature capture or photograph capture when completing each stop. However, you can use different validation methods for different stops within the same route based on your specific requirements.
2. Are the proof of delivery records stored permanently in the app?
Yes, all proof of delivery records including signatures and photographs are securely stored in your Zeo Route Planner account. These records remain accessible for future reference and can be retrieved whenever you need to verify a delivery or respond to customer inquiries.
3. What happens if I have poor internet connectivity when capturing proof of delivery?
The proof of delivery feature works offline, so you can capture signatures and photographs even without internet connectivity. The records will be automatically synced to your account once you regain internet connection, ensuring no delivery confirmations are lost.
4. Can customers receive a copy of their proof of delivery?
While the proof of delivery is stored in your Zeo Route Planner account for your records, you can share the confirmation with customers through other communication channels if your business process requires it. The digital format makes it easy to provide customers with delivery confirmation when needed.
5. Is there a limit to how many proof of delivery records I can store?
Zeo Route Planner doesn’t impose specific limits on the number of proof of delivery records you can store. The storage capacity depends on your account type and subscription plan. All records are efficiently compressed and stored to maximize your available storage space.
Still need help?
Contact us by writing to our team at support@zeoauto.com, and our team will reach out to you.
Are you a fleet owner?
Want to manage your drivers and deliveries easily?
Grow your business effortlessly with Zeo Routes Planner – optimize routes and manage multiple drivers with ease.
increase fuel savings
Hassle Free Deliveries & Pickups!
Optimize routes with our algorithm, reducing travel time and costs efficiently.
Get Started for Free