
Actualizado en: 13 de Abril, 2026
Si gestionas operaciones de reparto, ya sabes con qué frecuencia los clientes preguntan: "¿Dónde está mi pedido?" o "¿Cuándo llegará?". Las actualizaciones genéricas no son de mucha ayuda, y esa confusión suele provocar entregas fallidas y constantes consultas.
Ahí es donde los complementos de notificaciones automatizadas de Zeo Route Planner marcan la diferencia. Automatizan las notificaciones de entrega en cada etapa, para que tus clientes estén siempre informados. Y con la última actualización, estos mensajes no solo son automáticos, sino también más inteligentes, con configuraciones predeterminadas específicas para cada sector y la opción de personalizarlos según las necesidades de tu negocio.
¿Qué son los complementos de notificaciones automatizadas en Zeo Route Planner?
Zeo Route Planner ofrece complementos de notificaciones automatizadas que mantienen a tus clientes informados en cada etapa del proceso de entrega. Estas alertas se activan automáticamente según el progreso de la entrega, lo que te permite compartir actualizaciones puntuales sin esfuerzo manual y garantizar una comunicación constante con cada cliente.
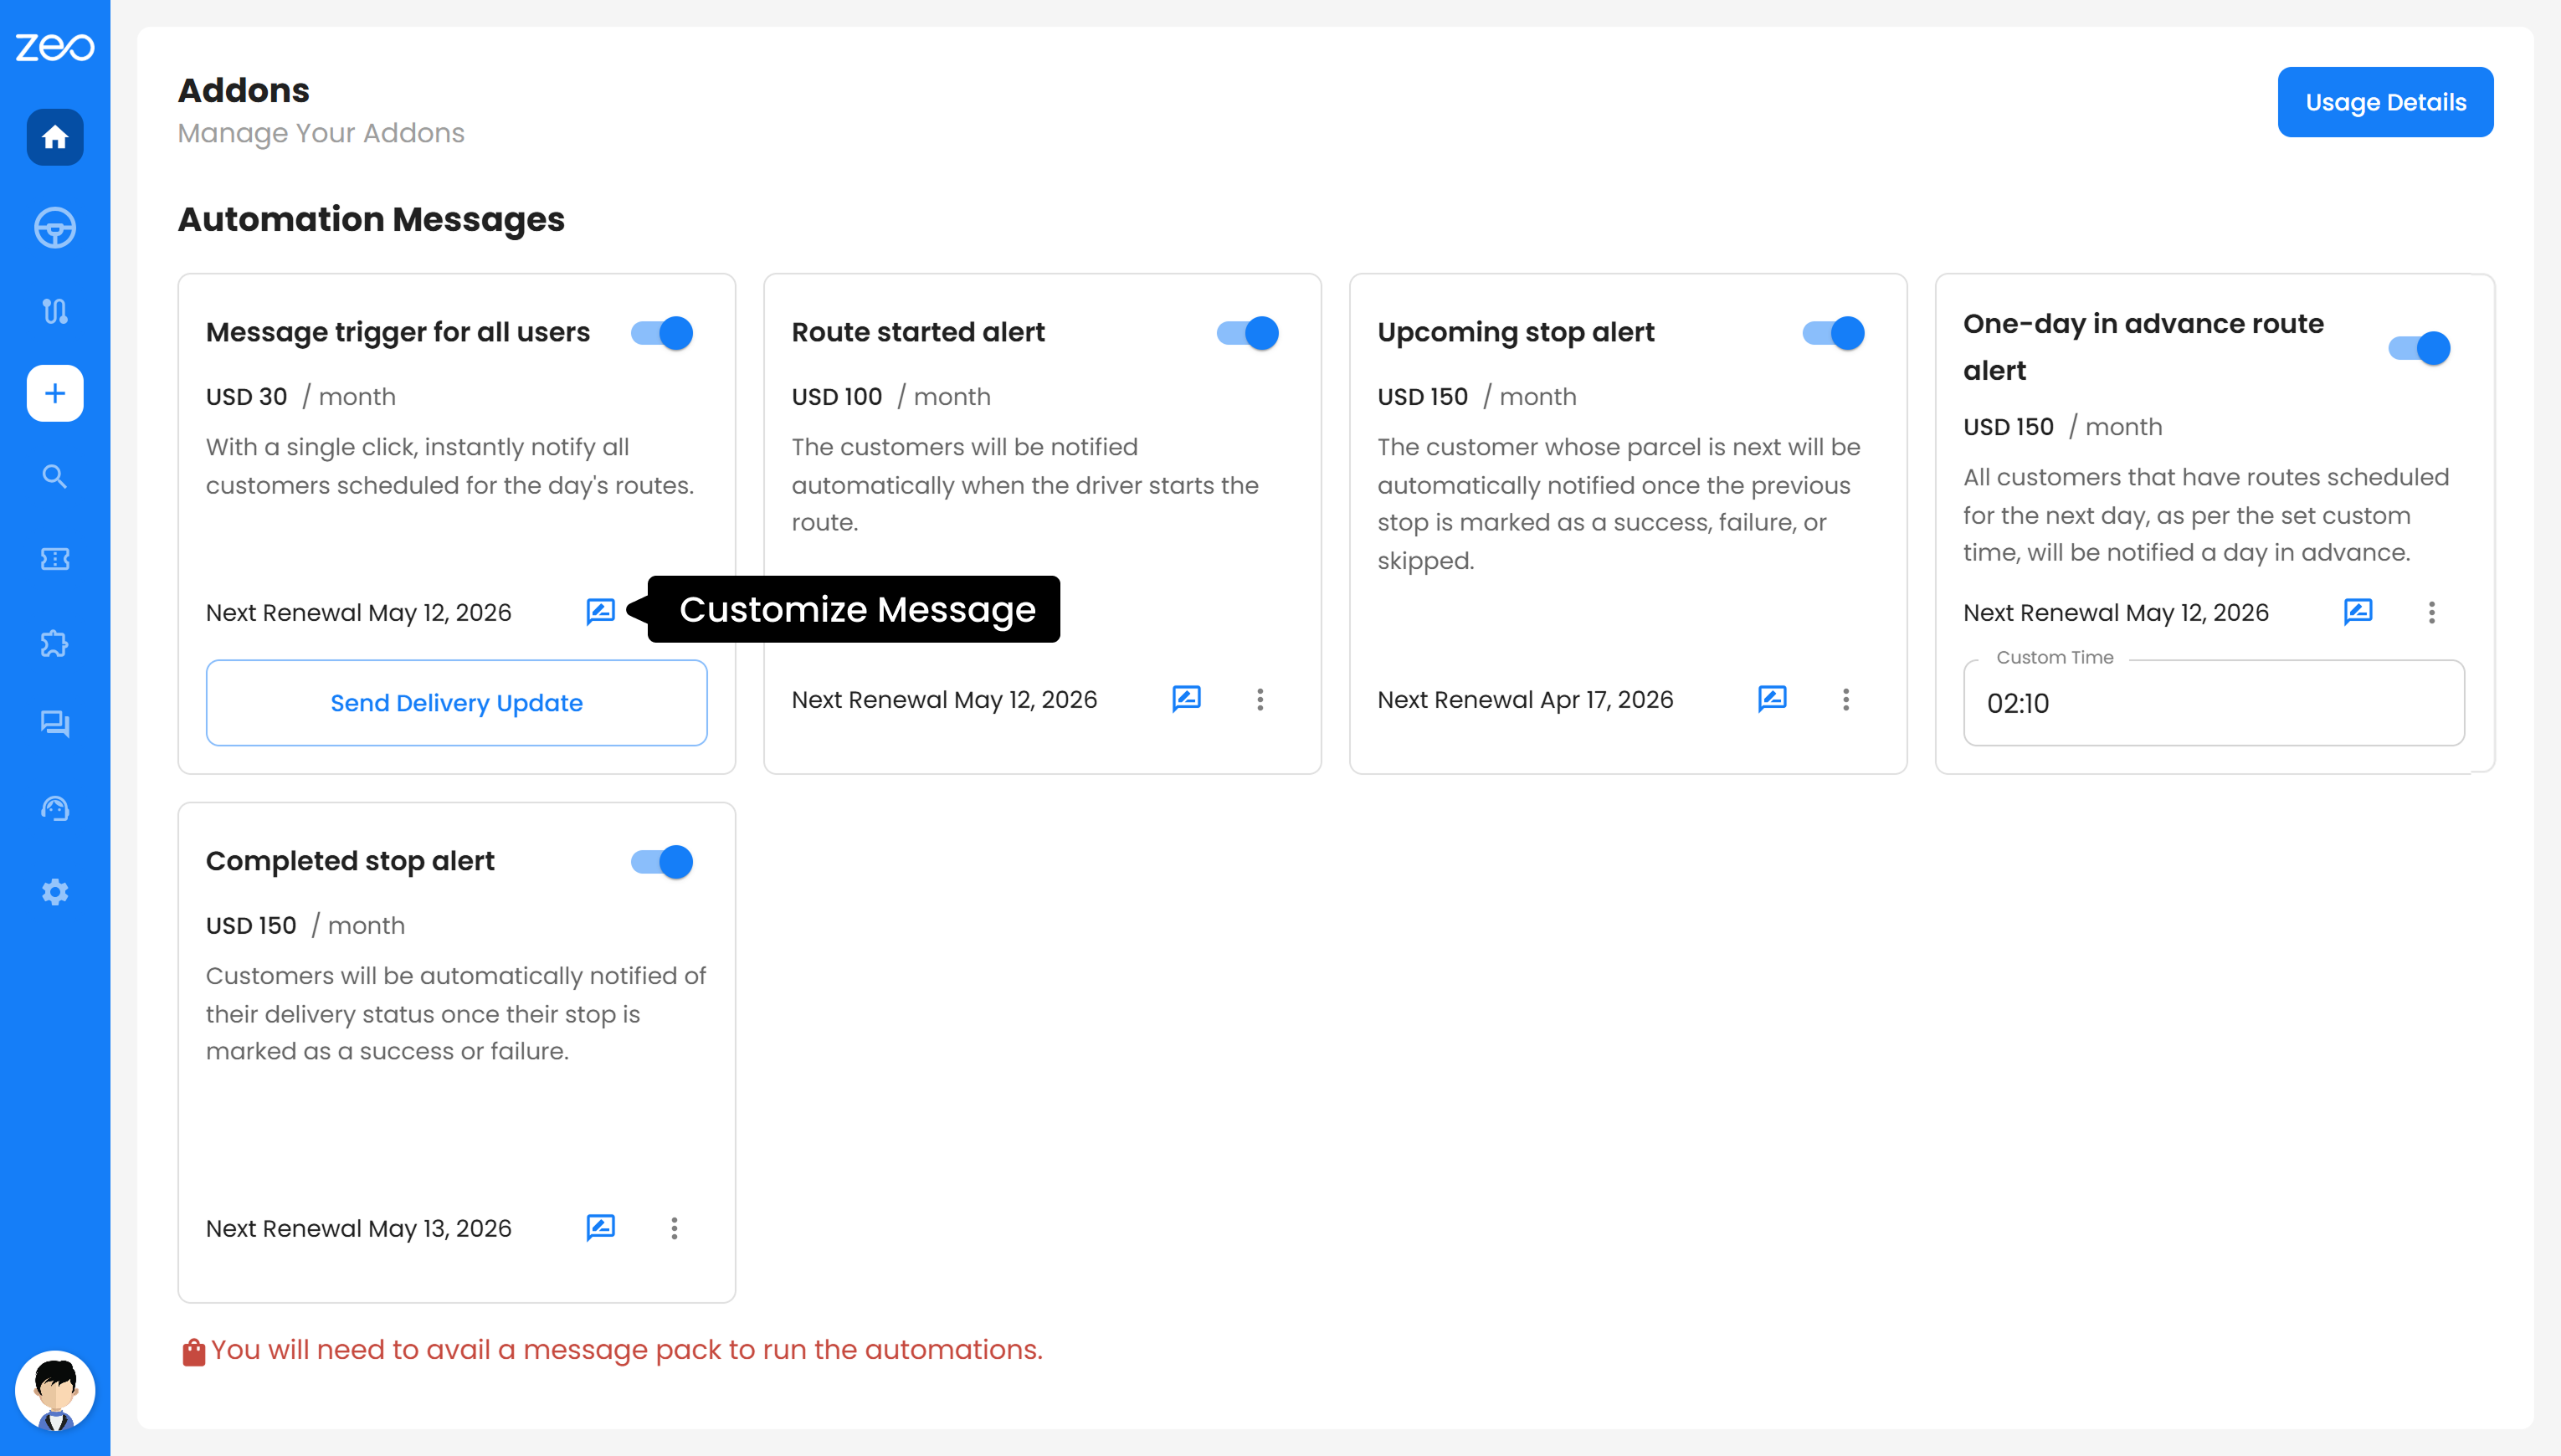
Las cinco alertas de notificaciones automatizadas de los complementos de Zeo Route Planner
Estos complementos de notificaciones automatizadas están diseñados para mantener a tus clientes informados en cada etapa clave del proceso de entrega. Cada alerta resuelve una brecha de comunicación específica, lo que te ayuda a brindar una experiencia más fluida y predecible.
1. Activador de mensajes para todos los usuarios

Con esta alerta, puedes notificar a todos los clientes programados para las entregas del día de una sola vez. En lugar de enviar mensajes individualmente, puedes actualizar a todos los que se encuentran en la ruta al instante con una sola acción.
Esto resulta especialmente útil cuando se gestiona un gran volumen de entregas. Los clientes saben desde el principio que su pedido está en camino, lo que genera expectativas claras y reduce las llamadas innecesarias para solicitar información actualizada.
2. Alerta de ruta iniciada
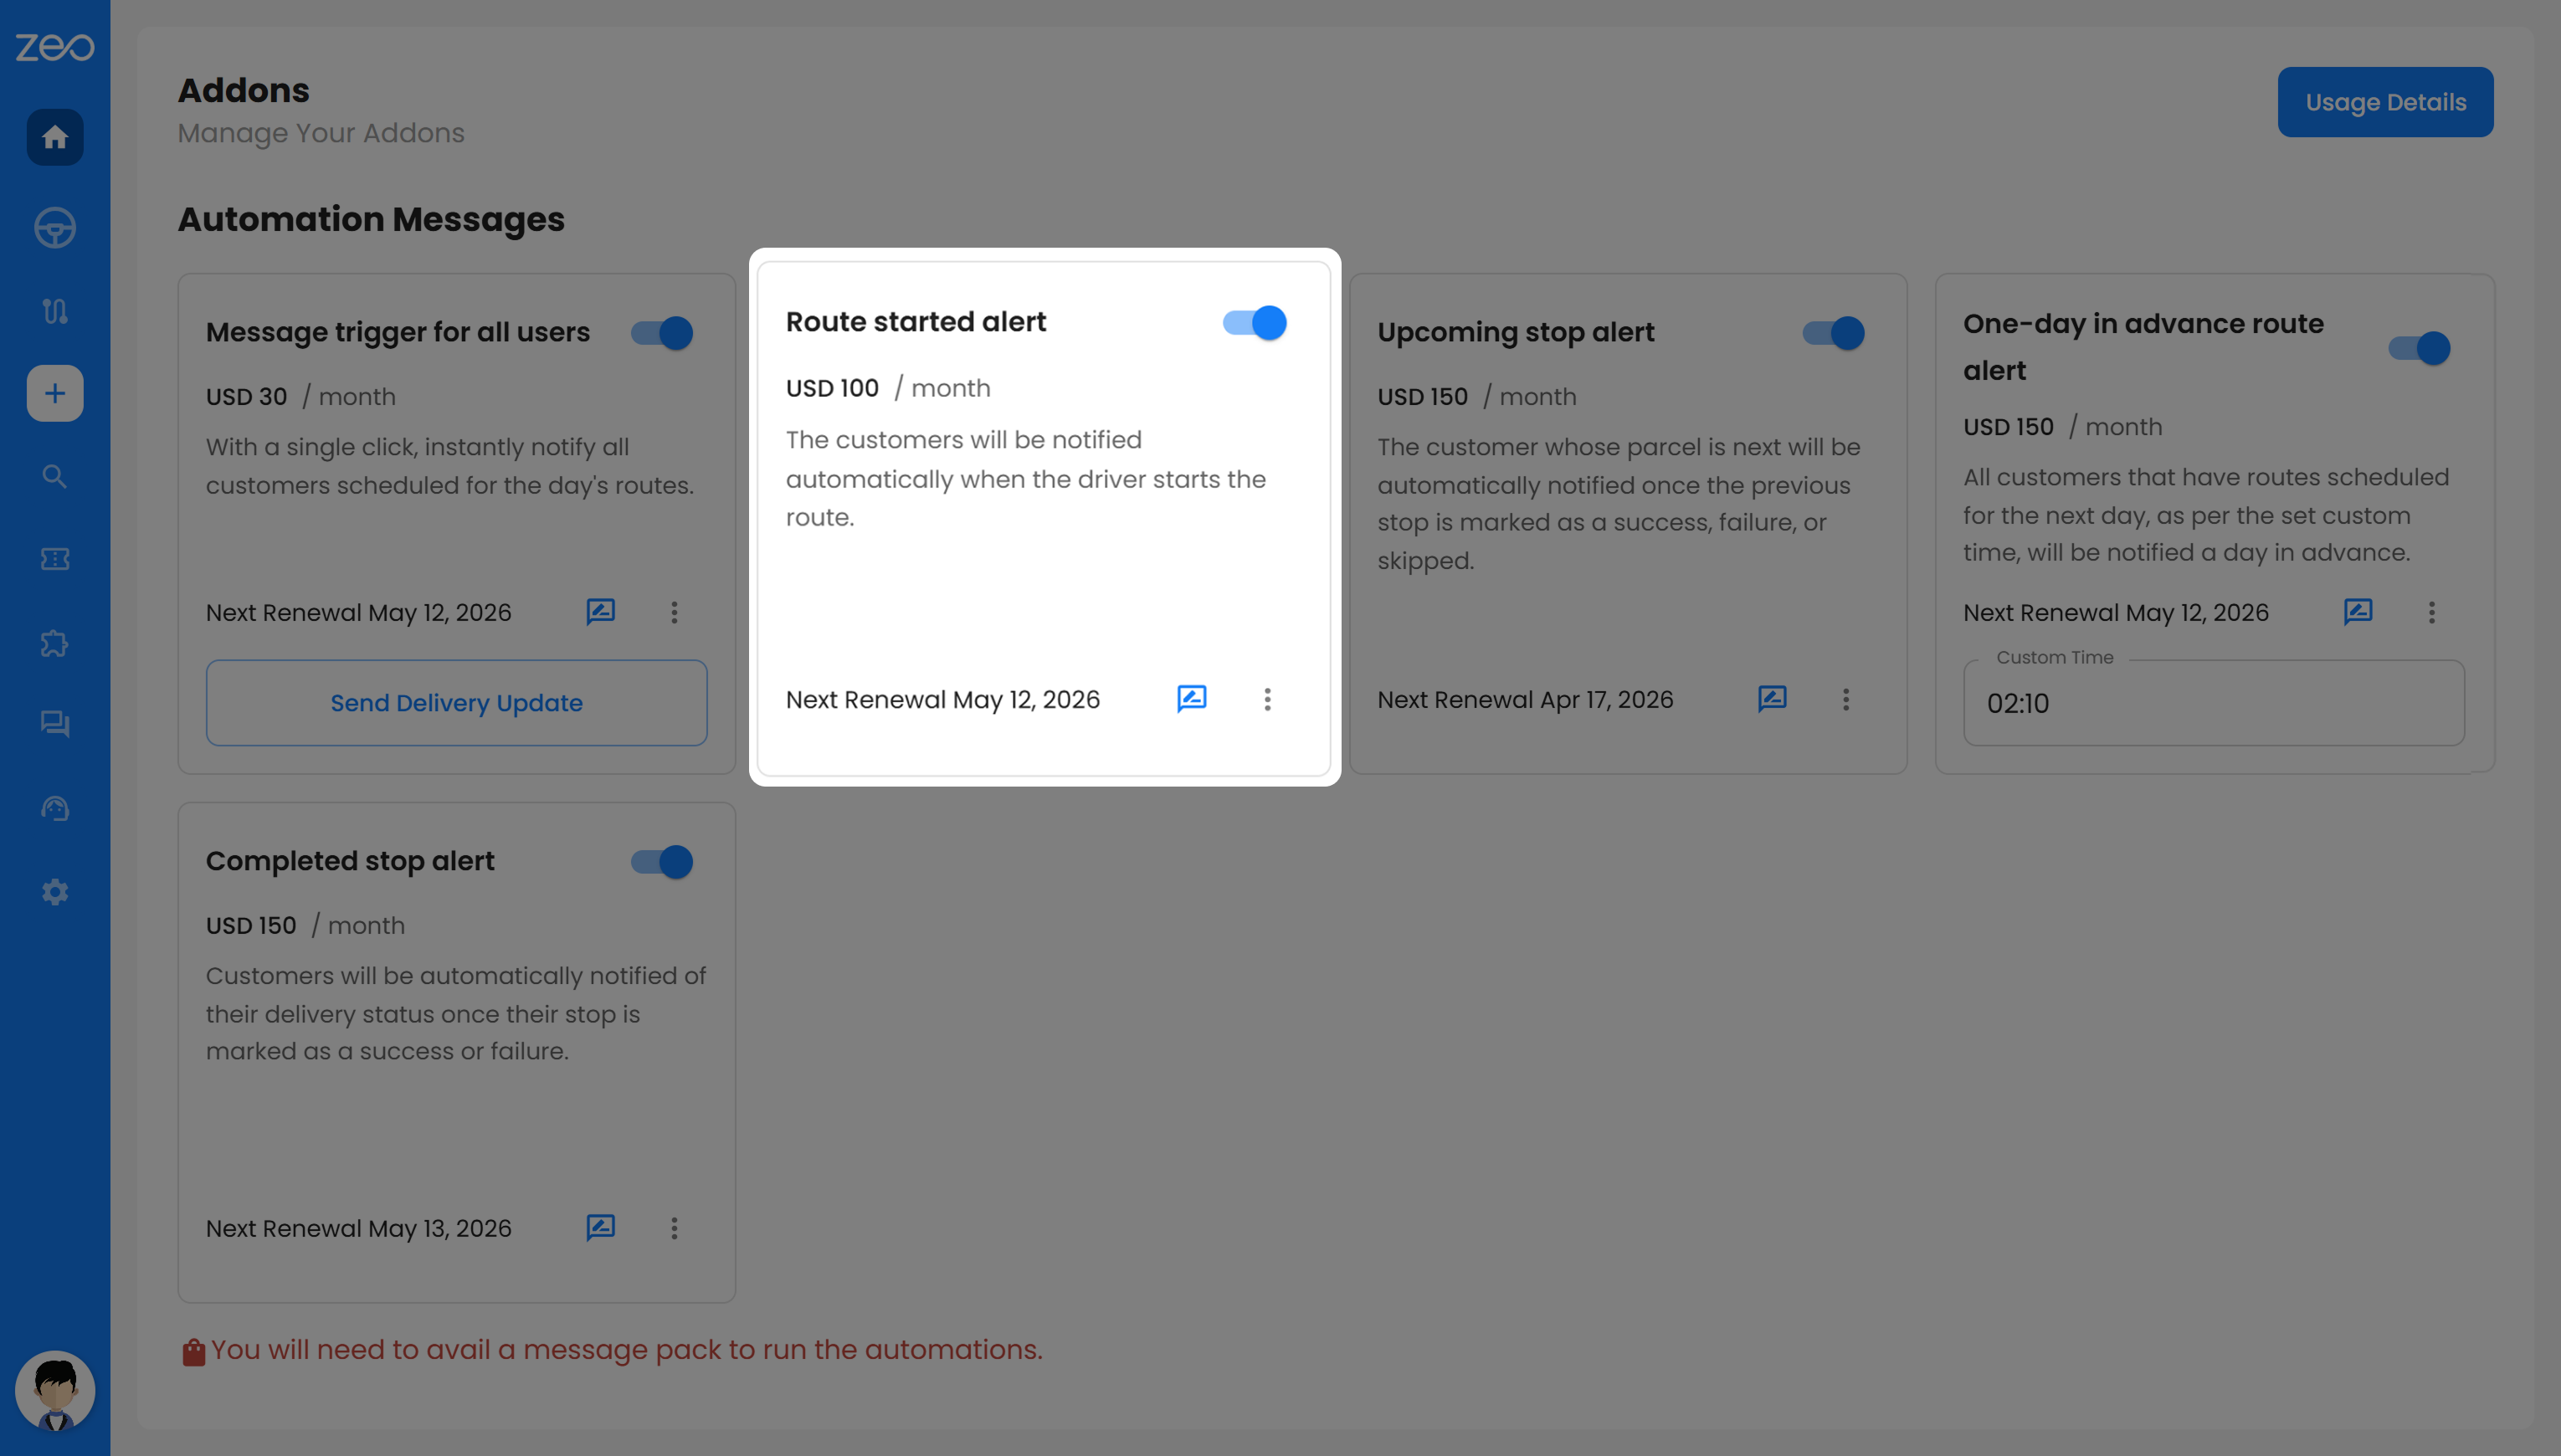
Esta alerta se envía a sus clientes en cuanto el conductor inicia la ruta. Les informa que las entregas han comenzado oficialmente y que su pedido llegará pronto.
Para usted, esto significa menos clientes preguntándose si su entrega se retrasa. Para sus clientes, les brinda una sensación de seguridad y les ayuda a planificar mejor su tiempo.
3. Alerta de parada próxima
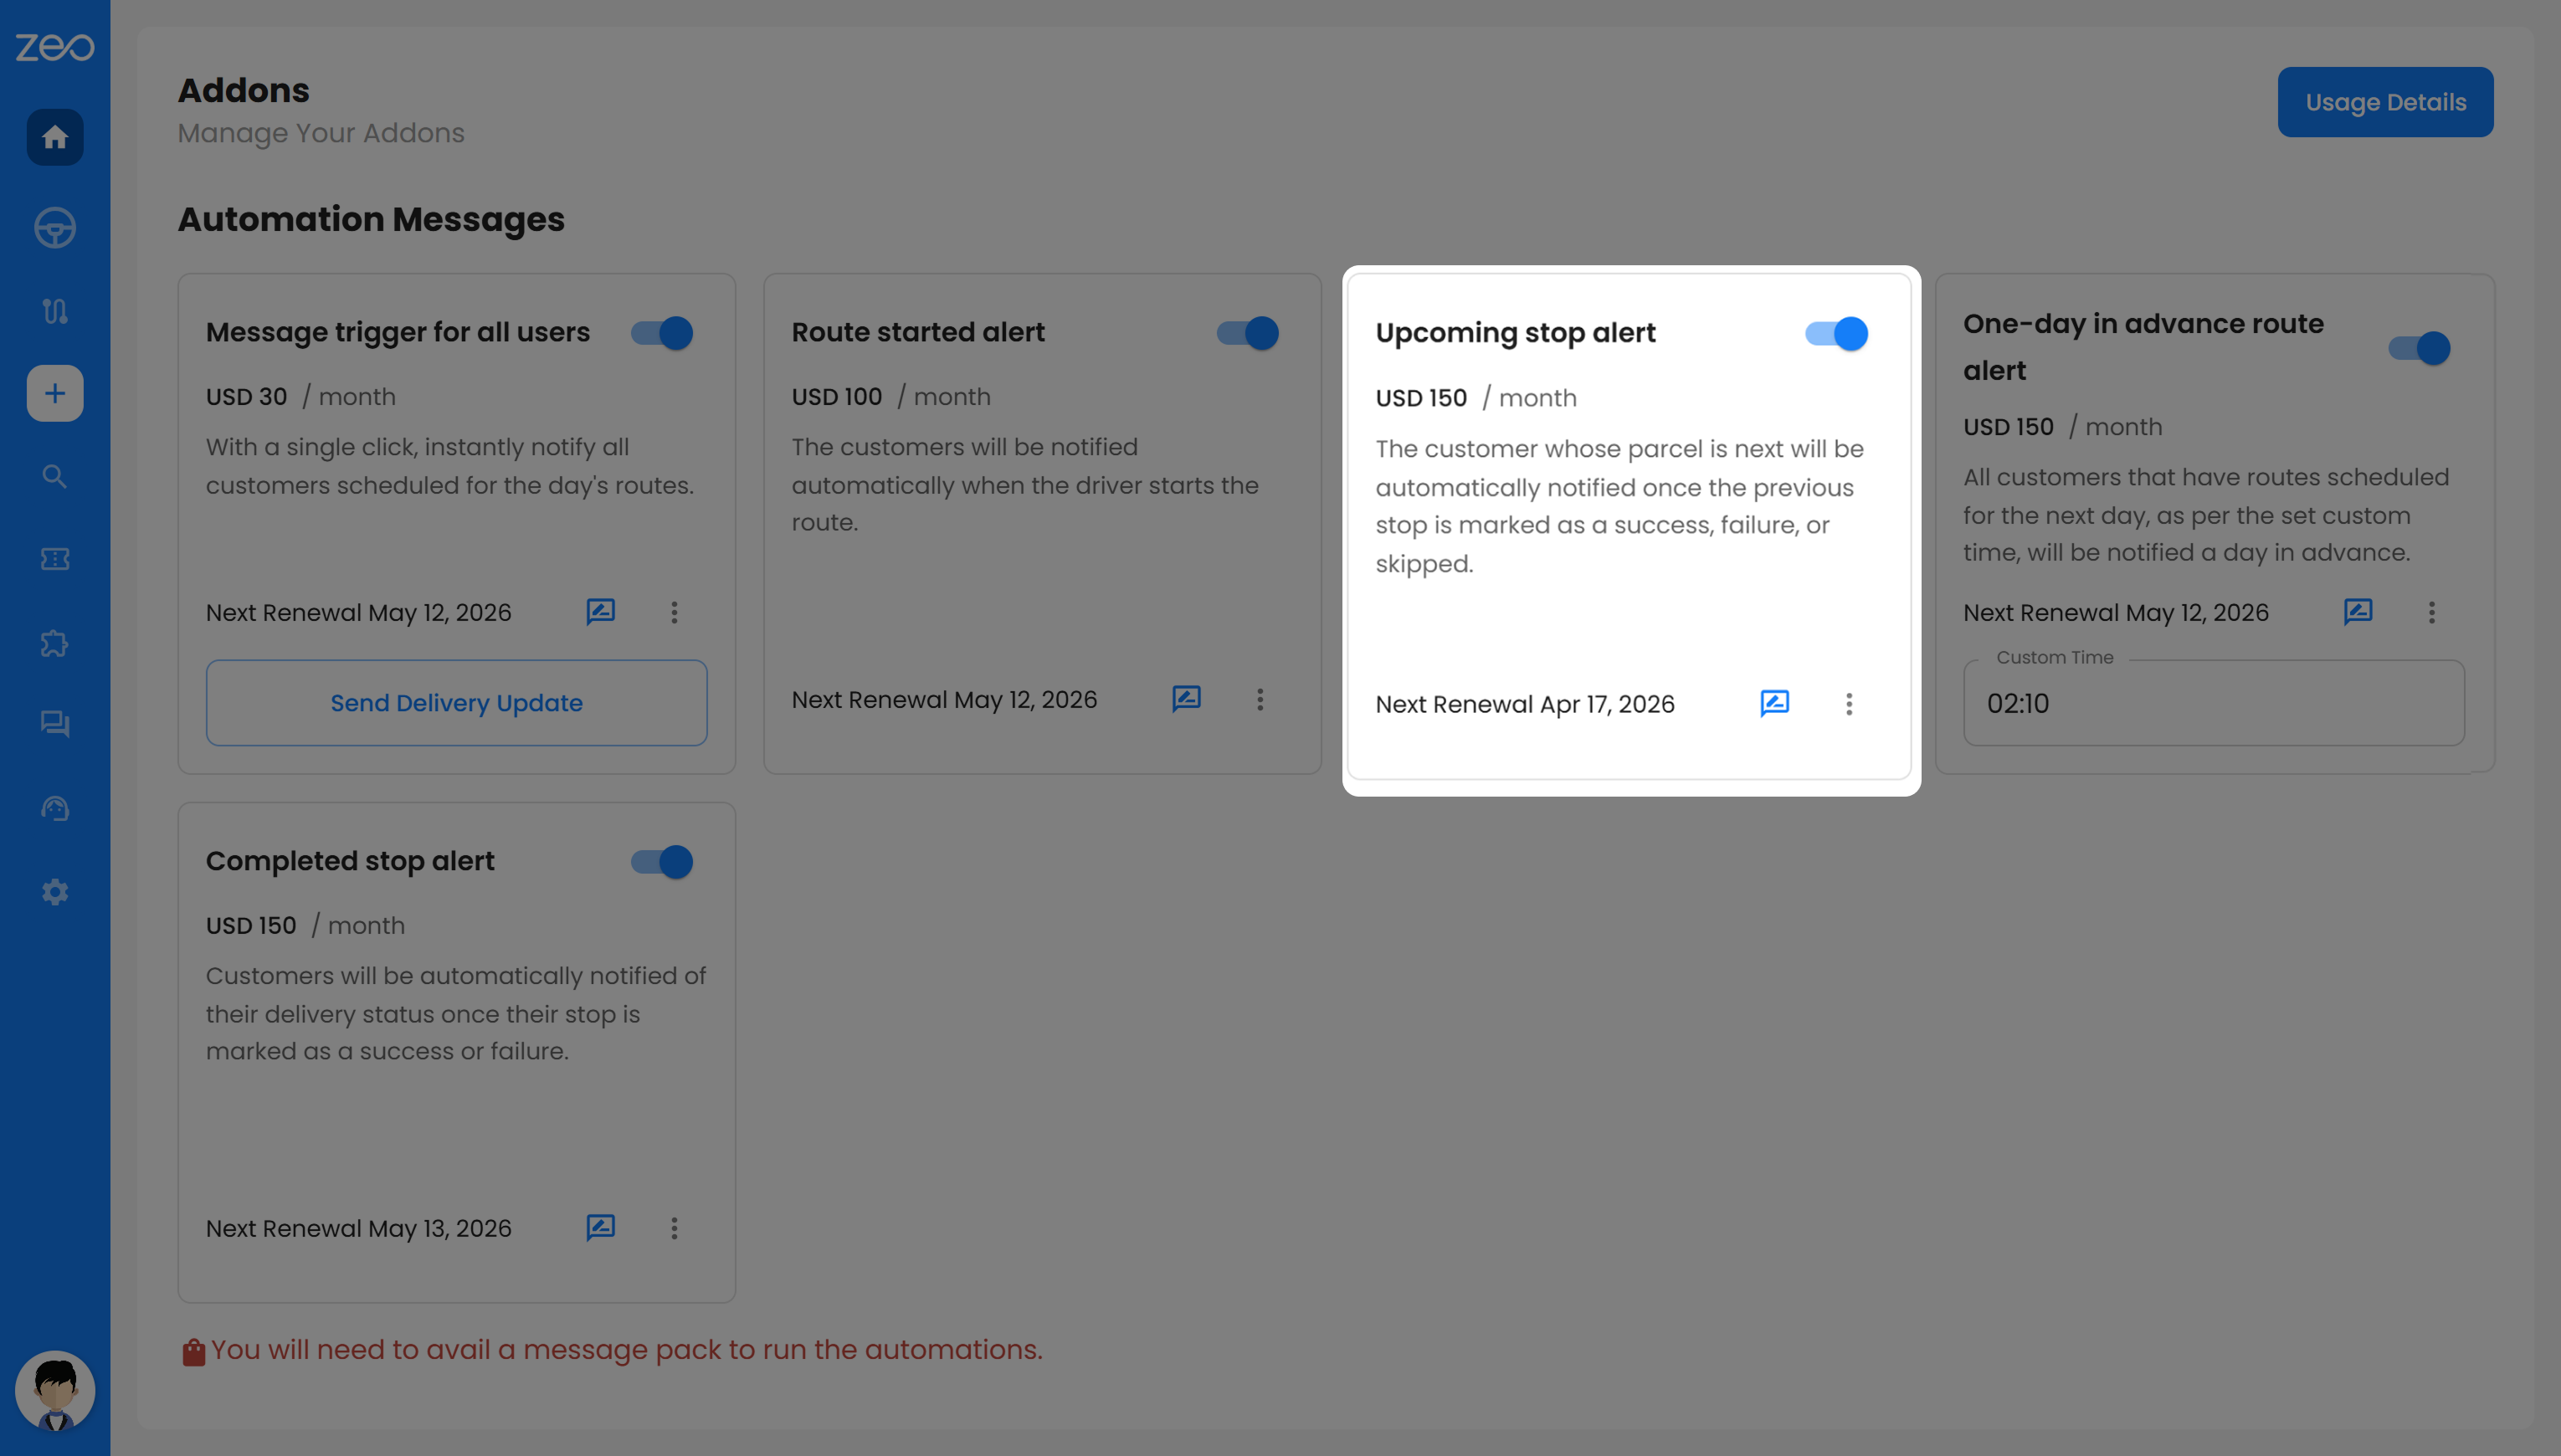
Esta alerta notifica al siguiente cliente en la fila justo antes de que el conductor llegue a él. Se activa después de que la parada anterior se haya completado, omitido o fallado.
Esto ayuda a que tus clientes estén listos a la hora acordada, en lugar de tener que esperar horas. Además, reduce las posibilidades de que se pierdan las entregas, ya que el cliente sabe que el repartidor está a punto de llegar.
4. Alerta de ruta con un día de anticipación
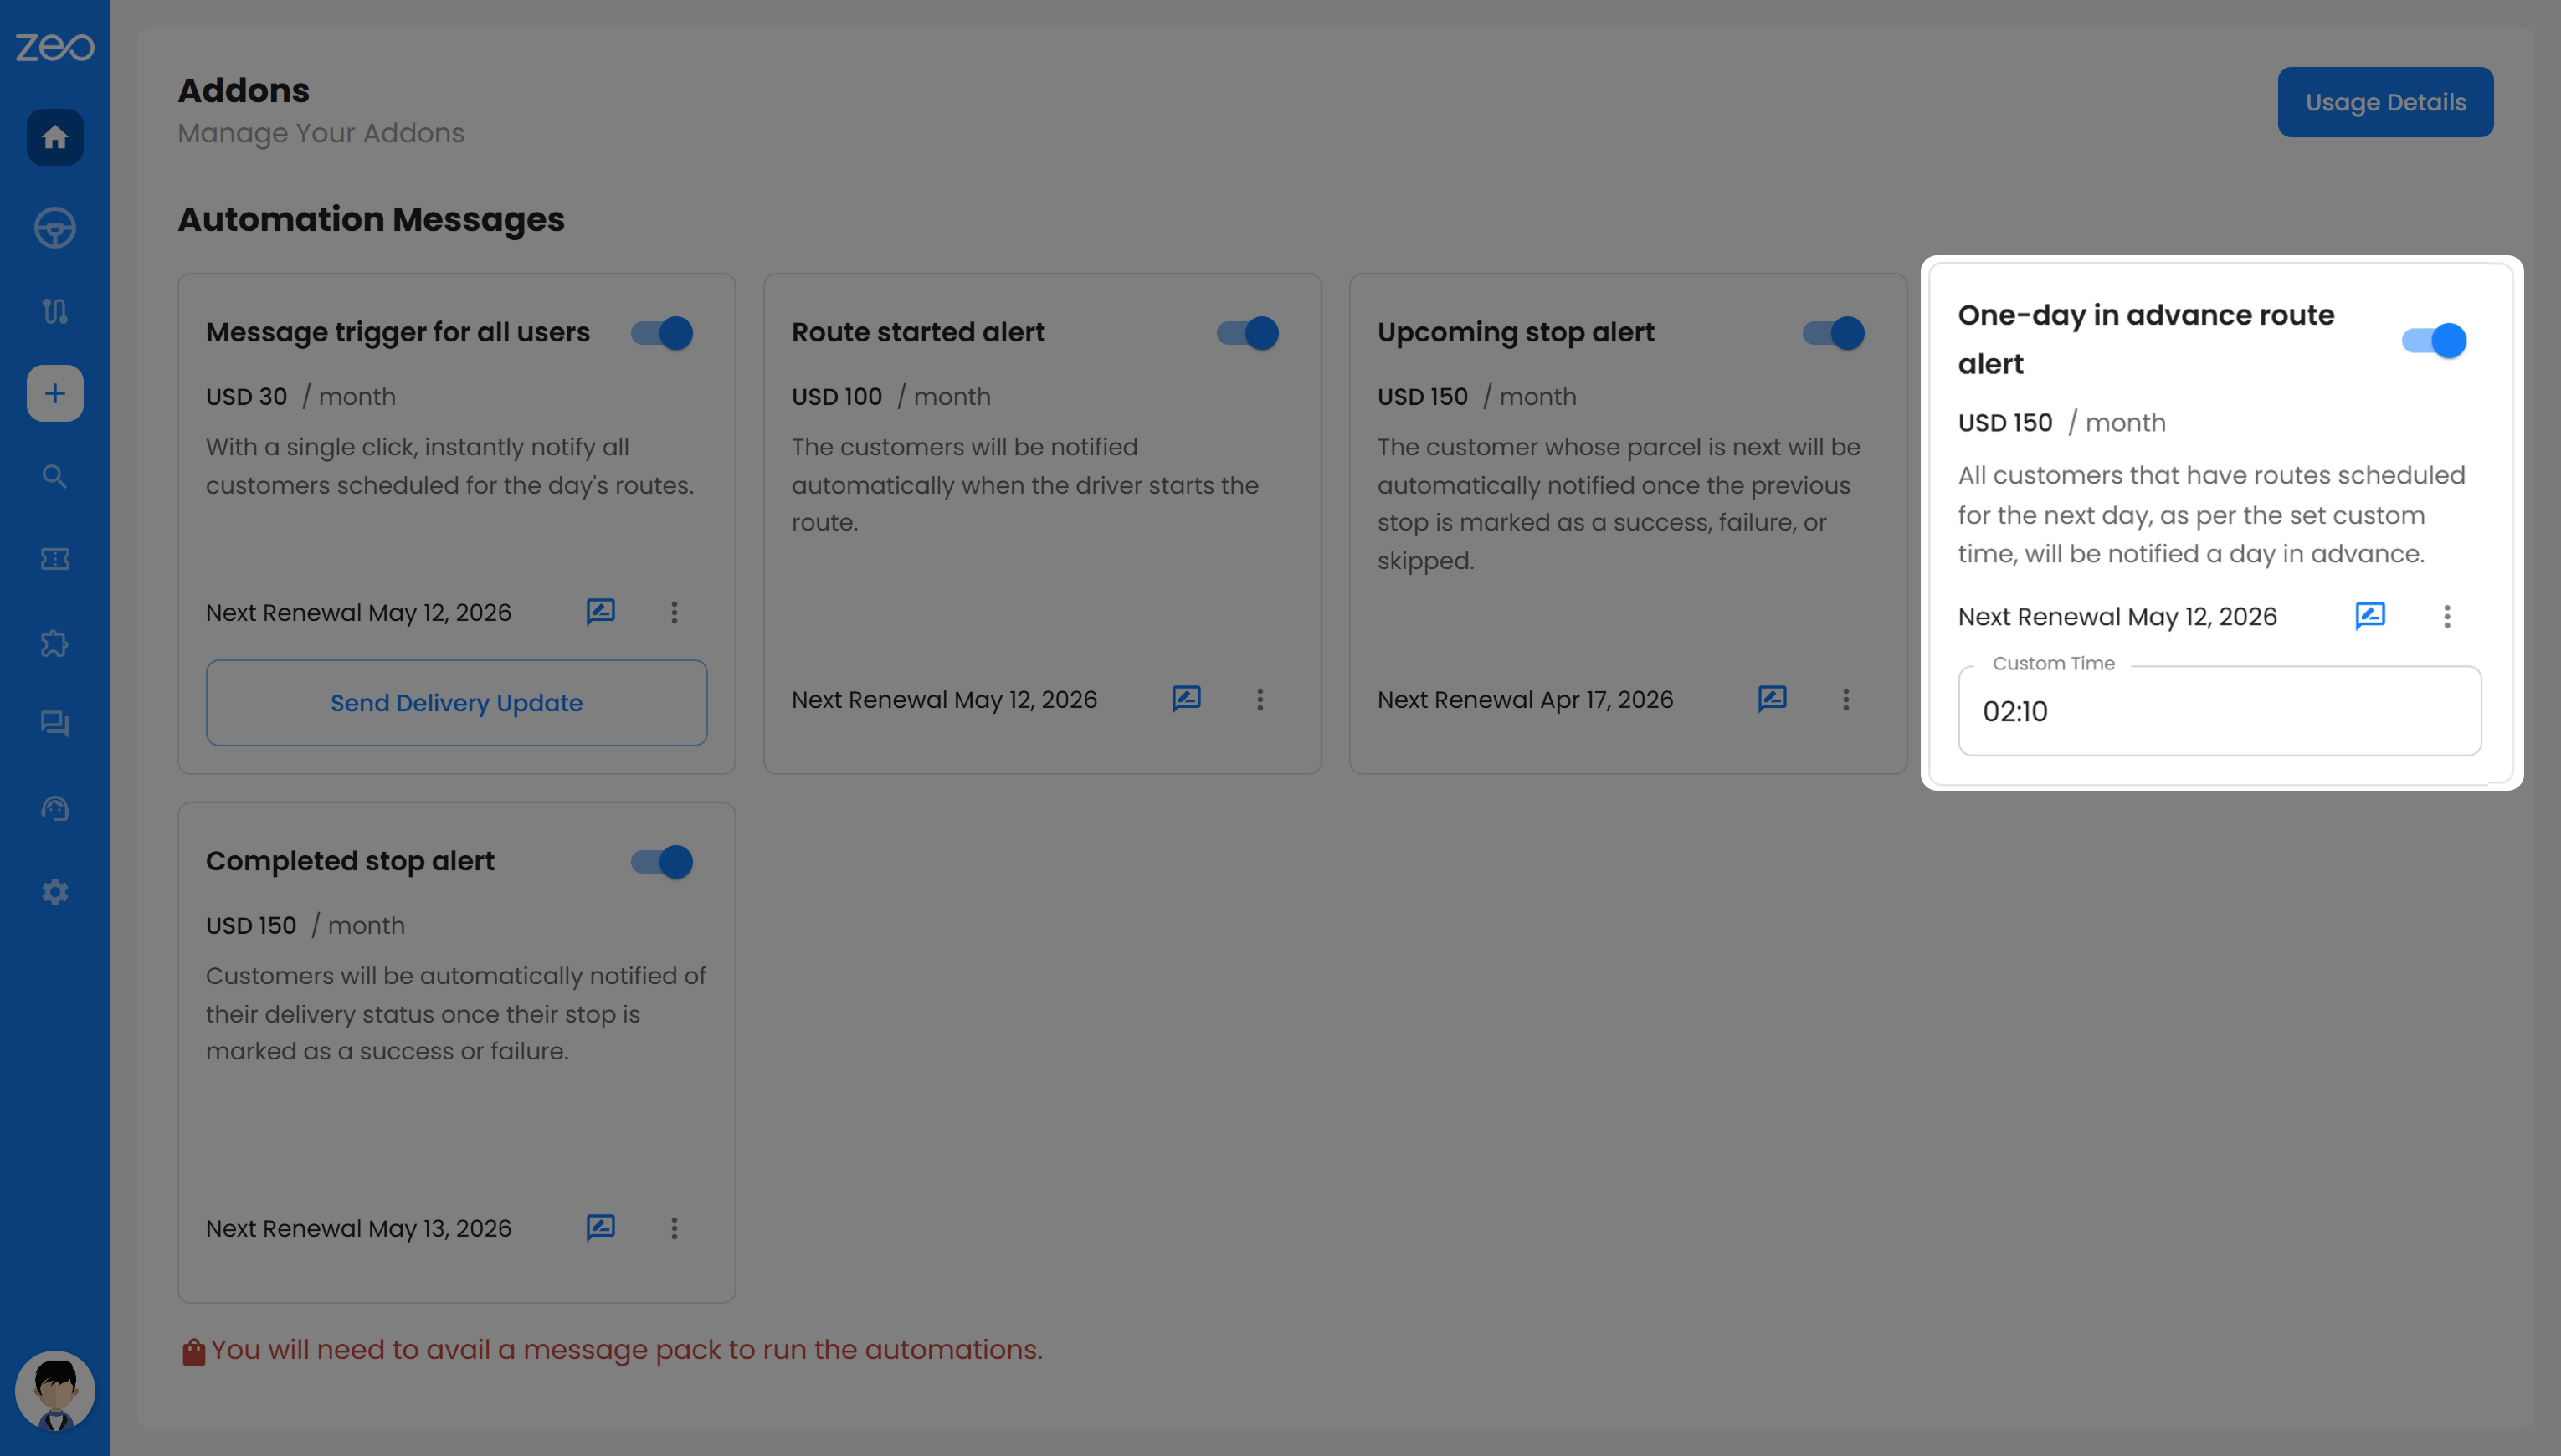
Esta alerta se envía a sus clientes un día antes de la fecha de entrega programada. Sirve como recordatorio para que puedan prepararse con antelación.
Esto resulta especialmente útil cuando la entrega requiere cierta preparación por parte del cliente. Reduce las cancelaciones de última hora, garantiza una operación más fluida y ayuda a completar más entregas con éxito.
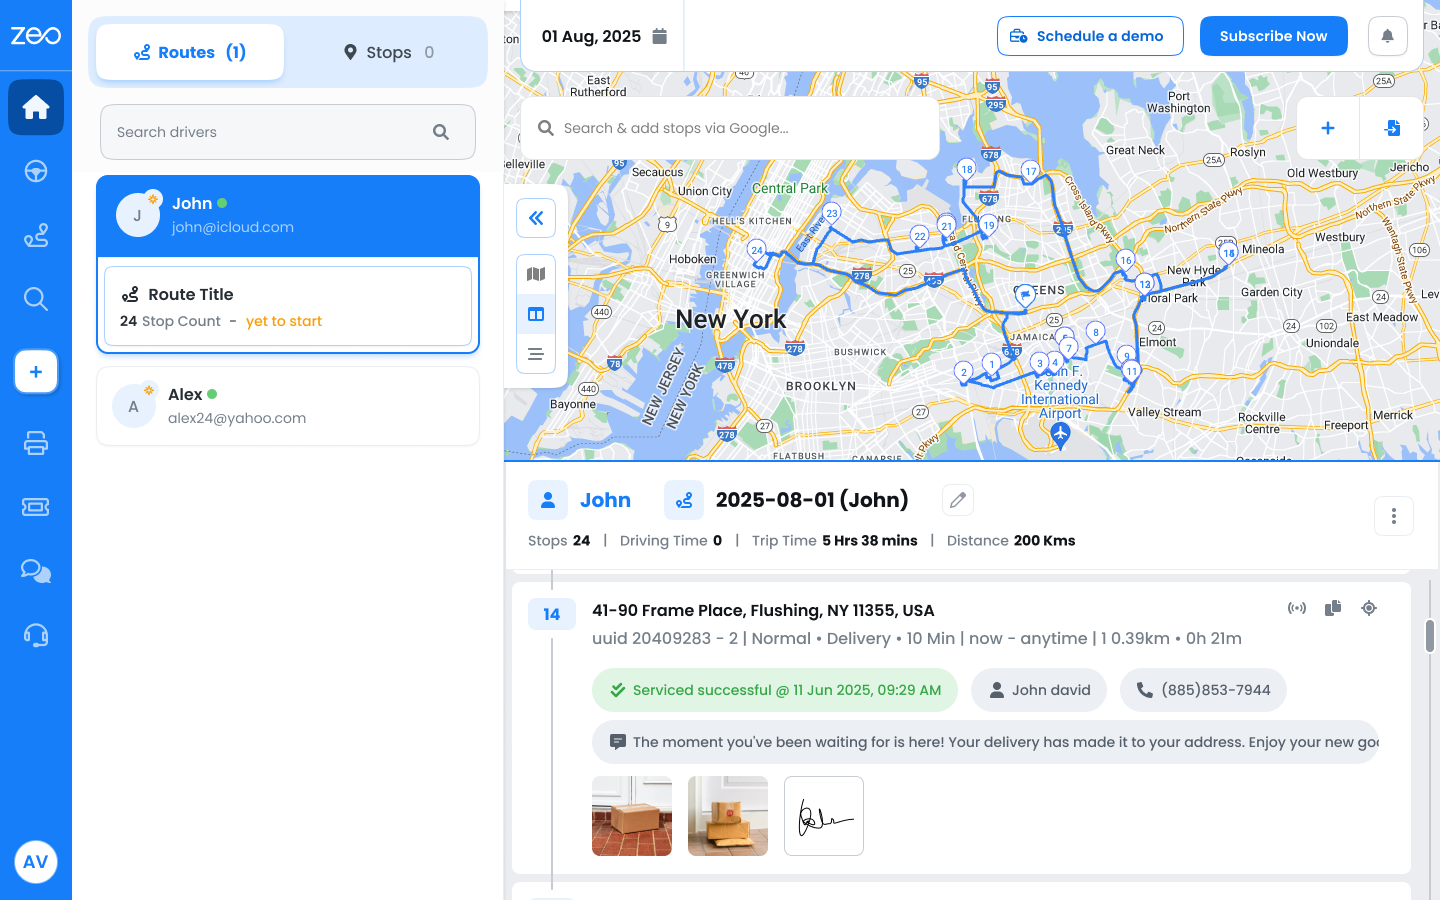
5. Alerta de parada completada
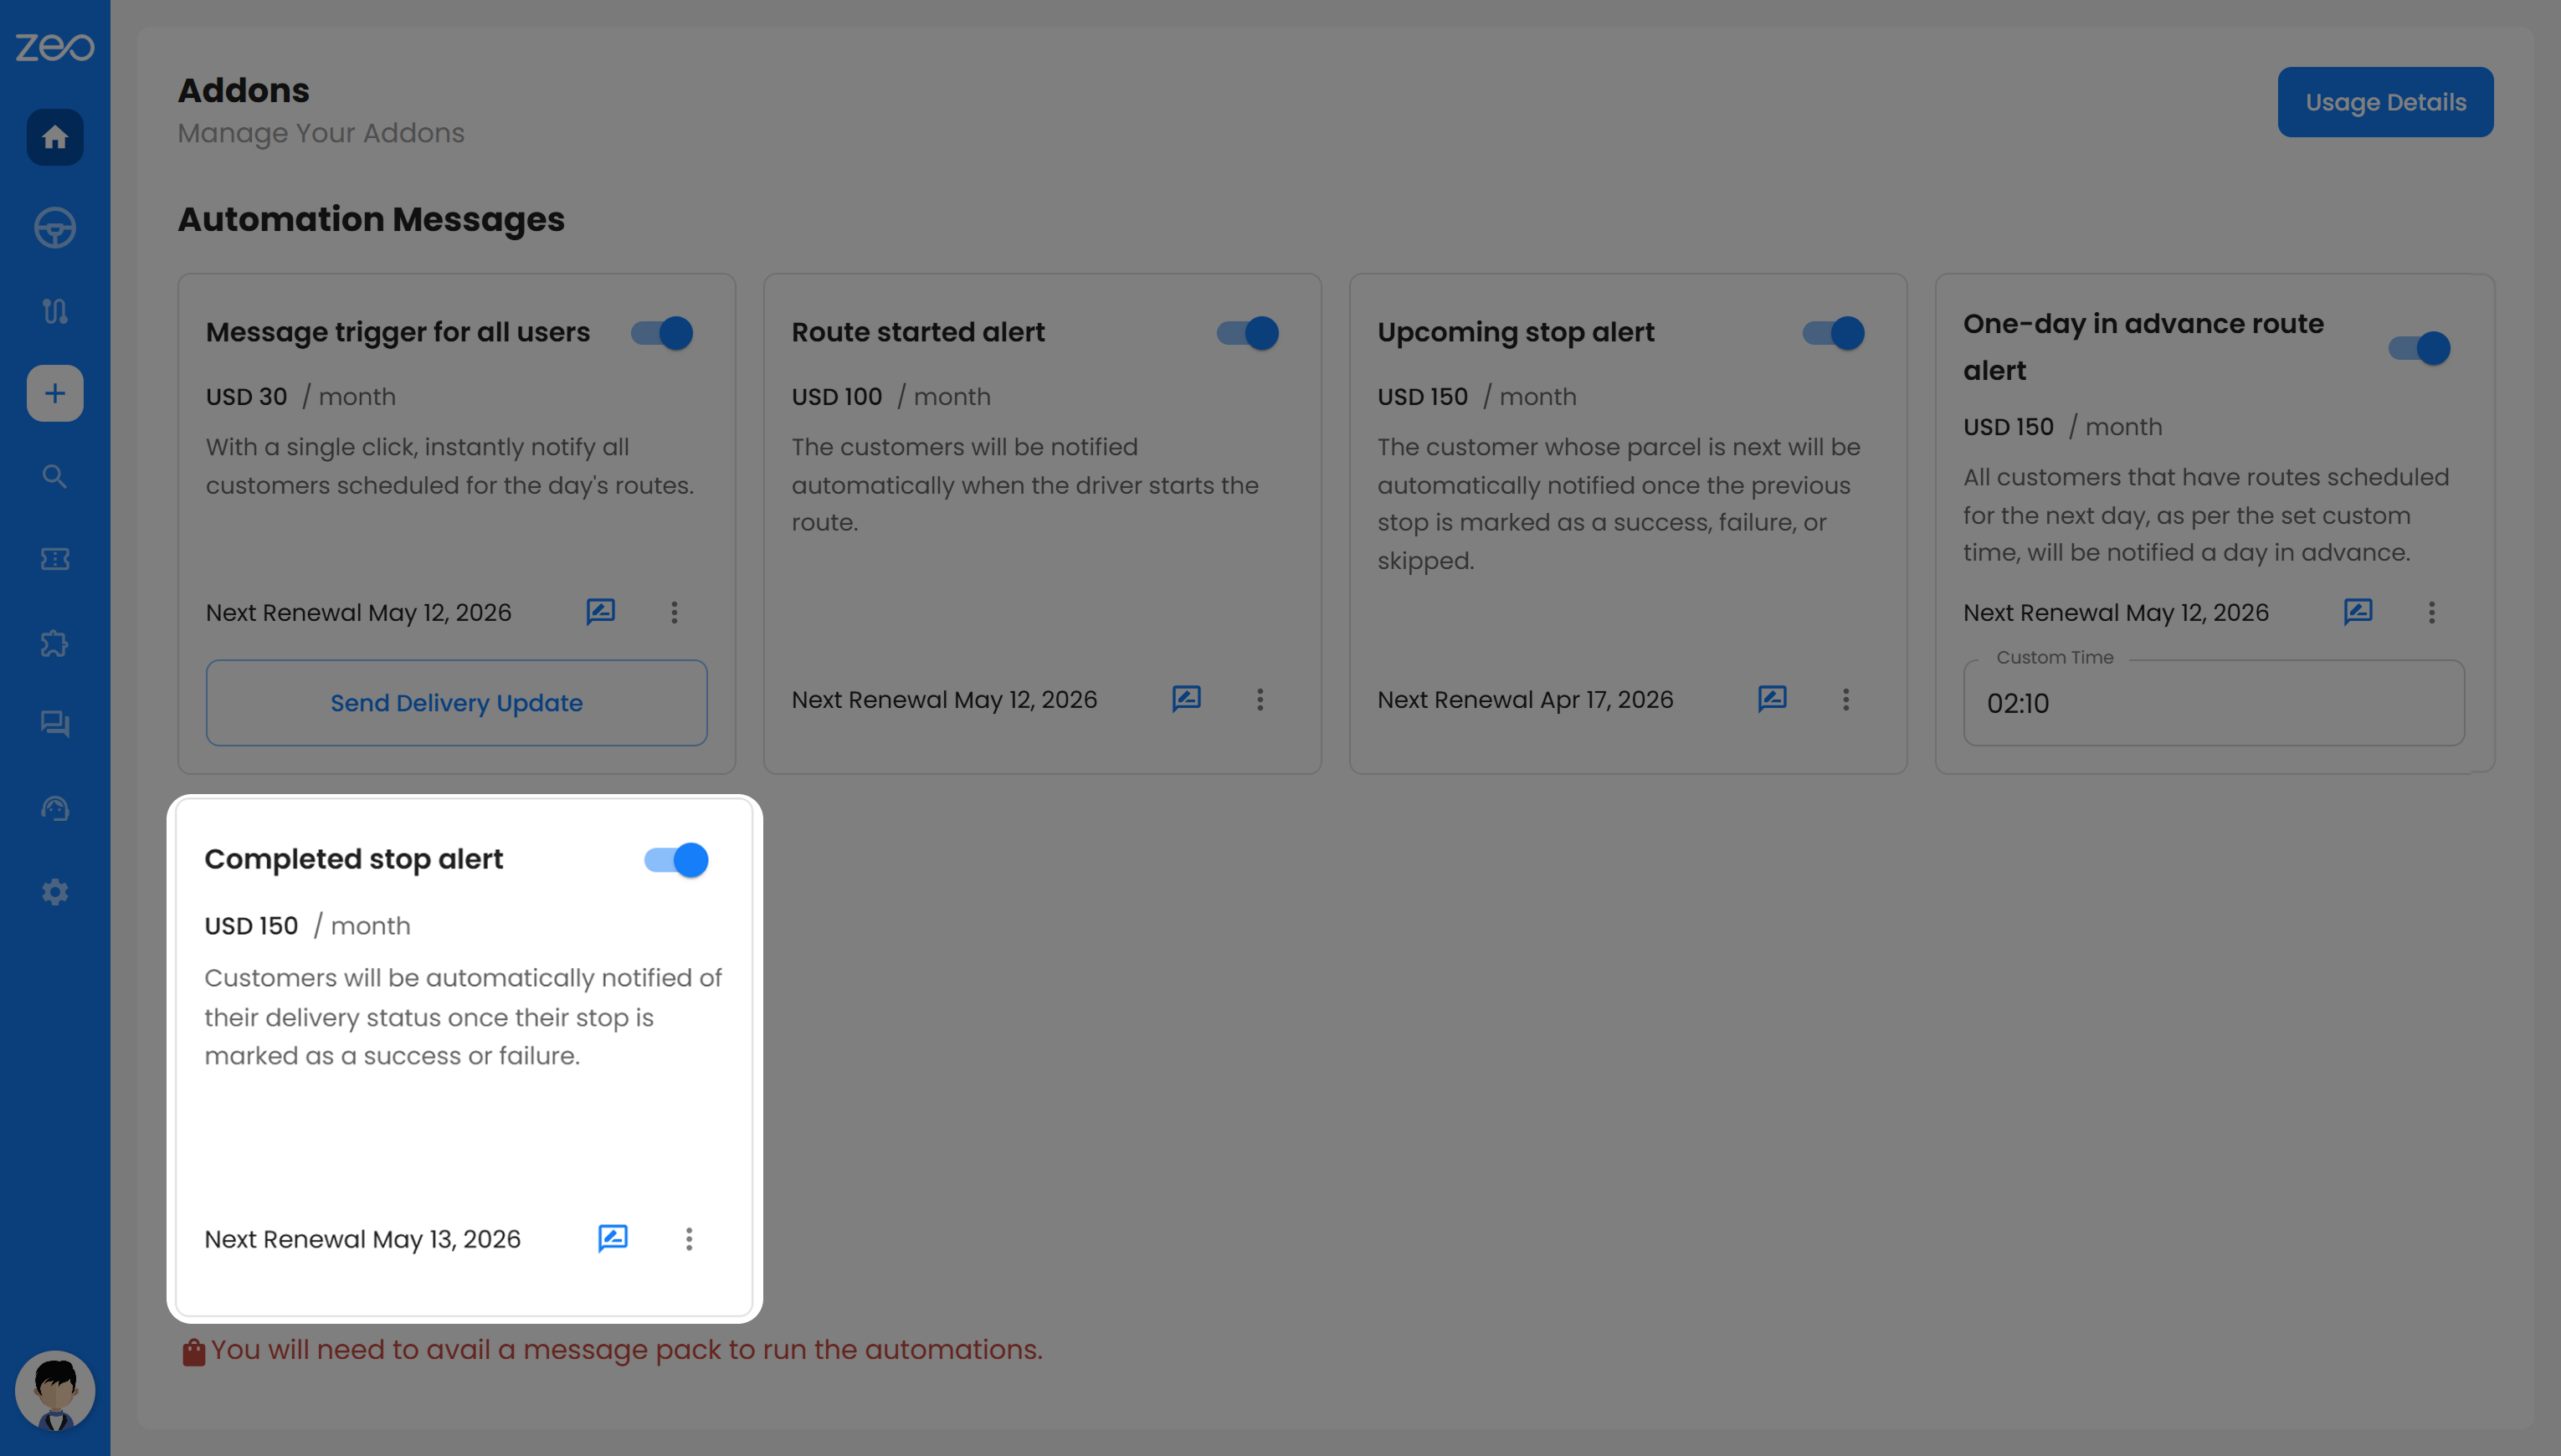
Esta alerta se activa cuando una entrega se marca como exitosa o fallida. Informa a tus clientes sobre el estado final de su entrega de inmediato.
Sus clientes no tienen que preocuparse por el seguimiento ni adivinar qué sucedió. Ya sea que la entrega se haya completado o deba reprogramarse, cuentan con información clara, lo que genera confianza y reduce las consultas al servicio de atención al cliente.
¿Qué incluye la función adicional?
Los complementos de notificaciones automatizadas de Zeo Route Planner están diseñados para automatizar la comunicación de entregas, permitiéndote controlar cómo se envían esos mensajes. Además de las alertas automatizadas, incluyen funciones que hacen que tu comunicación sea más relevante, flexible y útil para tus clientes.
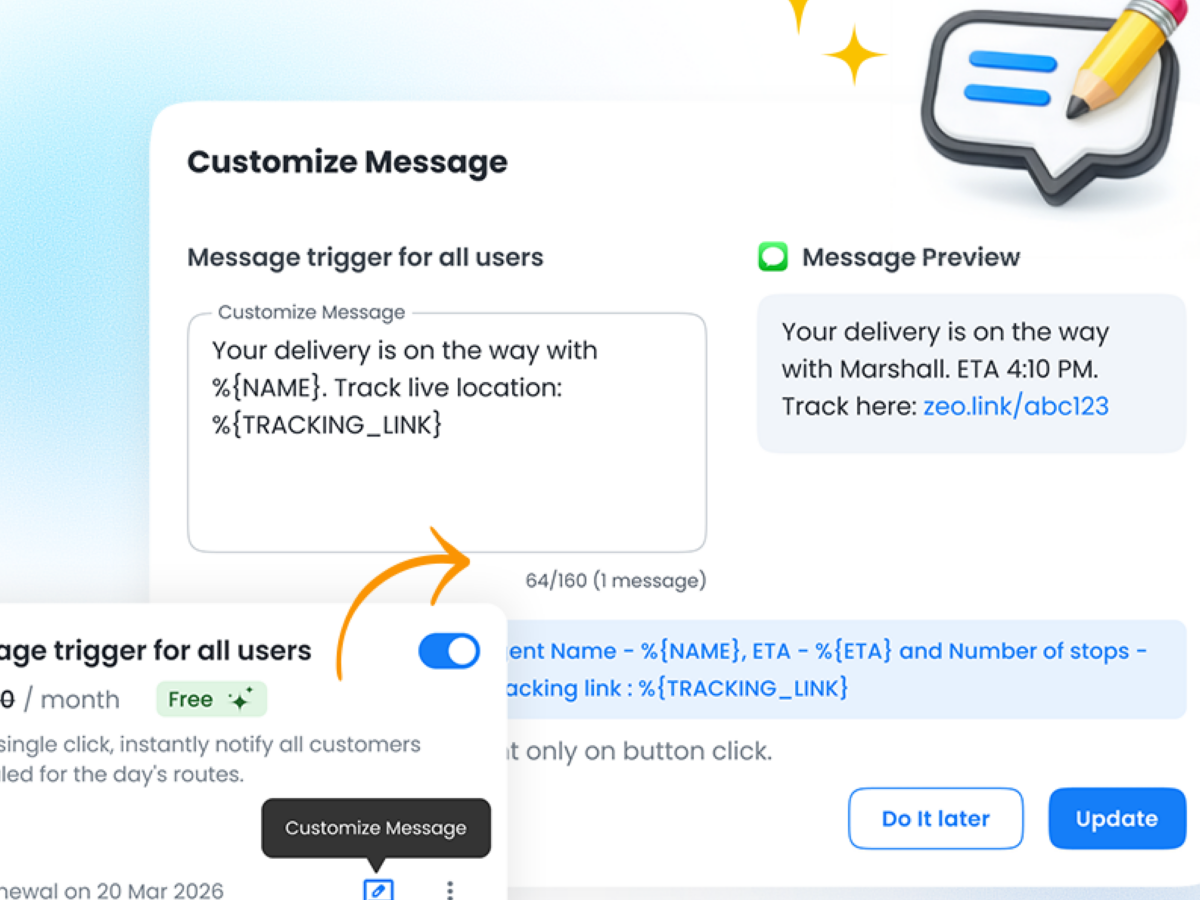
1. Personaliza los mensajes según las necesidades de tu negocio.
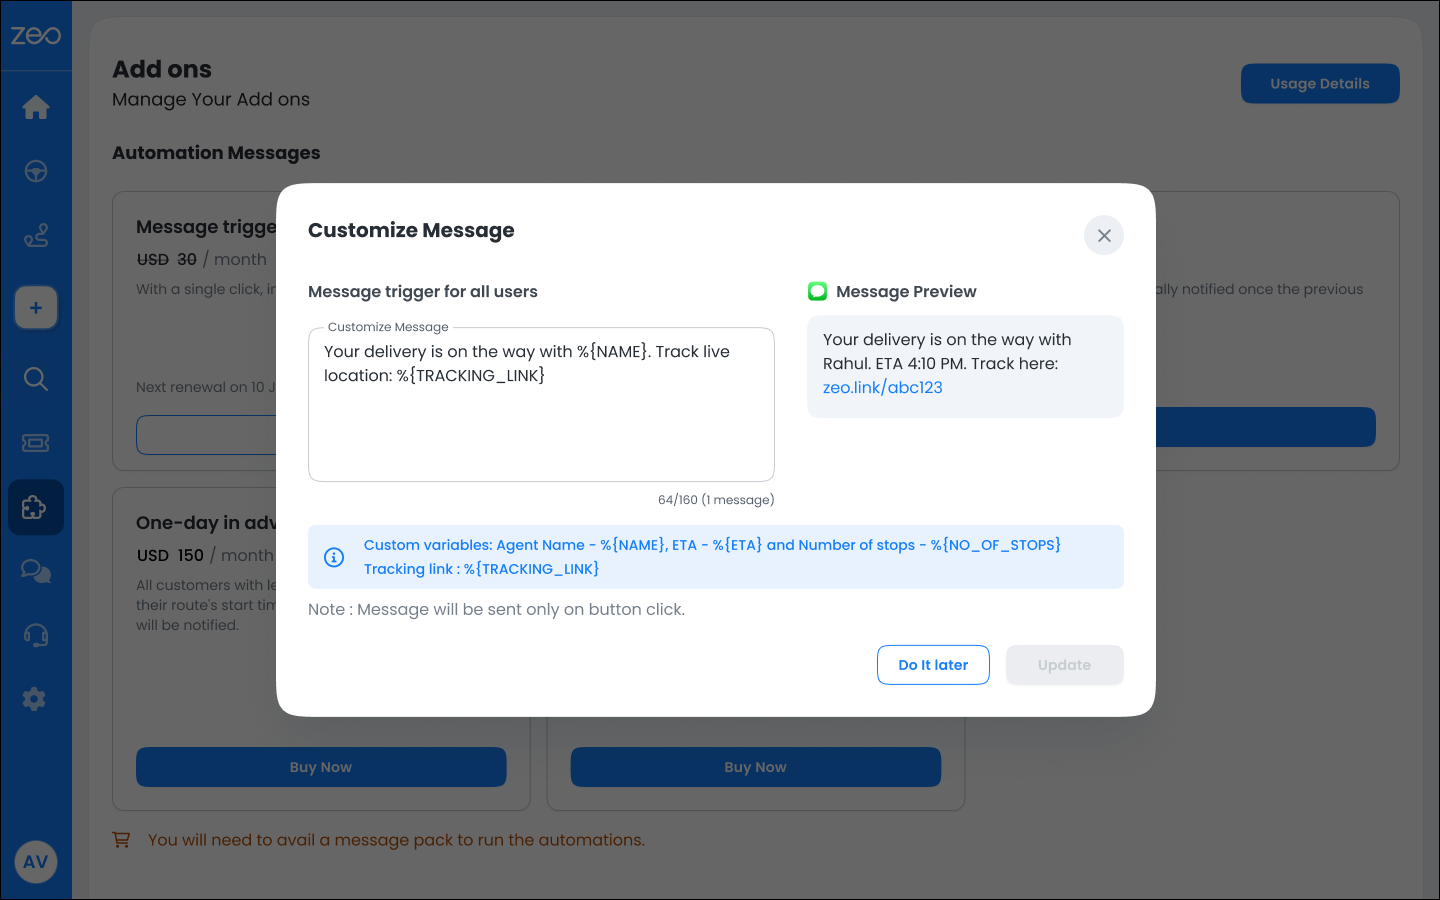
No todas las empresas se comunican de la misma manera, y los mensajes genéricos suelen pasar por alto detalles importantes que realmente interesan a tus clientes. Los complementos de notificaciones automatizadas te permiten personalizar tus mensajes para que reflejen tus operaciones, tu tono y el tipo de experiencia que deseas ofrecer.
Por ejemplo, en lugar de una simple actualización, puedes crear algo como: «Hola desde SwiftDeliver, tu pedido está en camino con %{NAME}. La hora estimada de llegada es %{ETA}. Puedes rastrear tu envío aquí: %{TRACKING_LINK}». Cuando se envía este mensaje, incluye automáticamente detalles en tiempo real, lo que lo hace más personal e informativo.
También puedes personalizar los mensajes para que se ajusten a tu flujo de trabajo. Por ejemplo, una empresa de servicios a domicilio podría enviar: «Actualización de UrbanCare: %{NAME} te visitará alrededor del %{ETA}. Por favor, mantén tu teléfono localizable para que nuestro equipo pueda contactarte a su llegada. Seguimiento de la visita: %{TRACKING_LINK}». Este tipo de mensaje no solo informa, sino que también guía al cliente sobre los pasos a seguir.
El límite de caracteres para los mensajes personalizados es de 135. Al personalizar tus mensajes, vas más allá de las notificaciones básicas y creas una experiencia de comunicación más personalizada. Los clientes se sienten más preparados y seguros, mientras que reduces las entregas fallidas, la confusión y los seguimientos innecesarios.
2. Mensajes predeterminados según el sector
Si no desea personalizar los mensajes usted mismo, los complementos de notificaciones automatizadas también proporcionan plantillas de mensajes predeterminadas que ya están alineadas con su sector.
Al configurar tu cuenta, seleccionas tu sector. En función de esto, el sistema te proporciona mensajes que se ajustan al contexto de tu negocio. Por ejemplo, una empresa de comercio electrónico verá mensajes relacionados con pedidos, mientras que un proveedor de servicios de salud verá mensajes relacionados con visitas o la llegada del personal.
Por ejemplo, en el comercio electrónico, una alerta de inicio de ruta diría: «¡Tu pedido está en camino! El conductor %{NAME} llegará a las %{ETA}». En logística, la misma alerta se centraría en la entrega, como por ejemplo: «Tu ruta de entrega ha comenzado. El conductor %{NAME} llegará a las %{ETA}».
Avance:
Para comercio electrónico: “¡Su pedido está en camino! David llegará a las 4:30”.
Para fines logísticos: “Su ruta de entrega ha comenzado. David llegará a las 4:30”.
aumentar el ahorro de combustible
¡Entregas y recogidas sin problemas!
Optimice rutas con nuestro algoritmo, reduciendo tiempos y costos de viaje de manera eficiente.
Empieza gratis
En el sector sanitario, los mensajes se adaptan para reflejar las visitas, como por ejemplo «%{NAME} está de camino para su cita programada», mientras que en el sector de la alimentación y las bebidas, el tono es más amigable con el cliente, como por ejemplo «Su pedido está en camino. Seguimiento de la entrega: %{TRACKING_LINK}».
Avance:
Para asuntos de salud: David está de camino para su cita programada.
Para comida y bebidas: Su pedido está en camino. Rastree su entrega: zeo.link/abc123.
Esto garantiza que tu comunicación siempre sea relevante para tu negocio. Puedes empezar a usar complementos de notificaciones automatizadas de inmediato, sin necesidad de configurar los mensajes desde cero, y seguir ofreciendo actualizaciones claras y contextuales a tus clientes.
¿Cómo personalizar los mensajes en Zeo Route Planner?
Personalizar tus mensajes es sencillo y puedes hacerlo directamente desde tu panel de control. Puedes actualizar cada mensaje adicional en pocos pasos, sin necesidad de configuración técnica.
Paso 1: Abra el panel de control de Zeo
Paso 2: Ve a la sección Complementos desde tu panel de control

Paso 3: Seleccione el complemento que desea editar y haga clic en “Personalizar mensaje”.
Paso 4: Actualiza el mensaje con el texto que prefieras.
Paso 5: Agregue variables dinámicas como %{NAME}, %{ETA} o %{TRACKING_LINK} si es necesario.
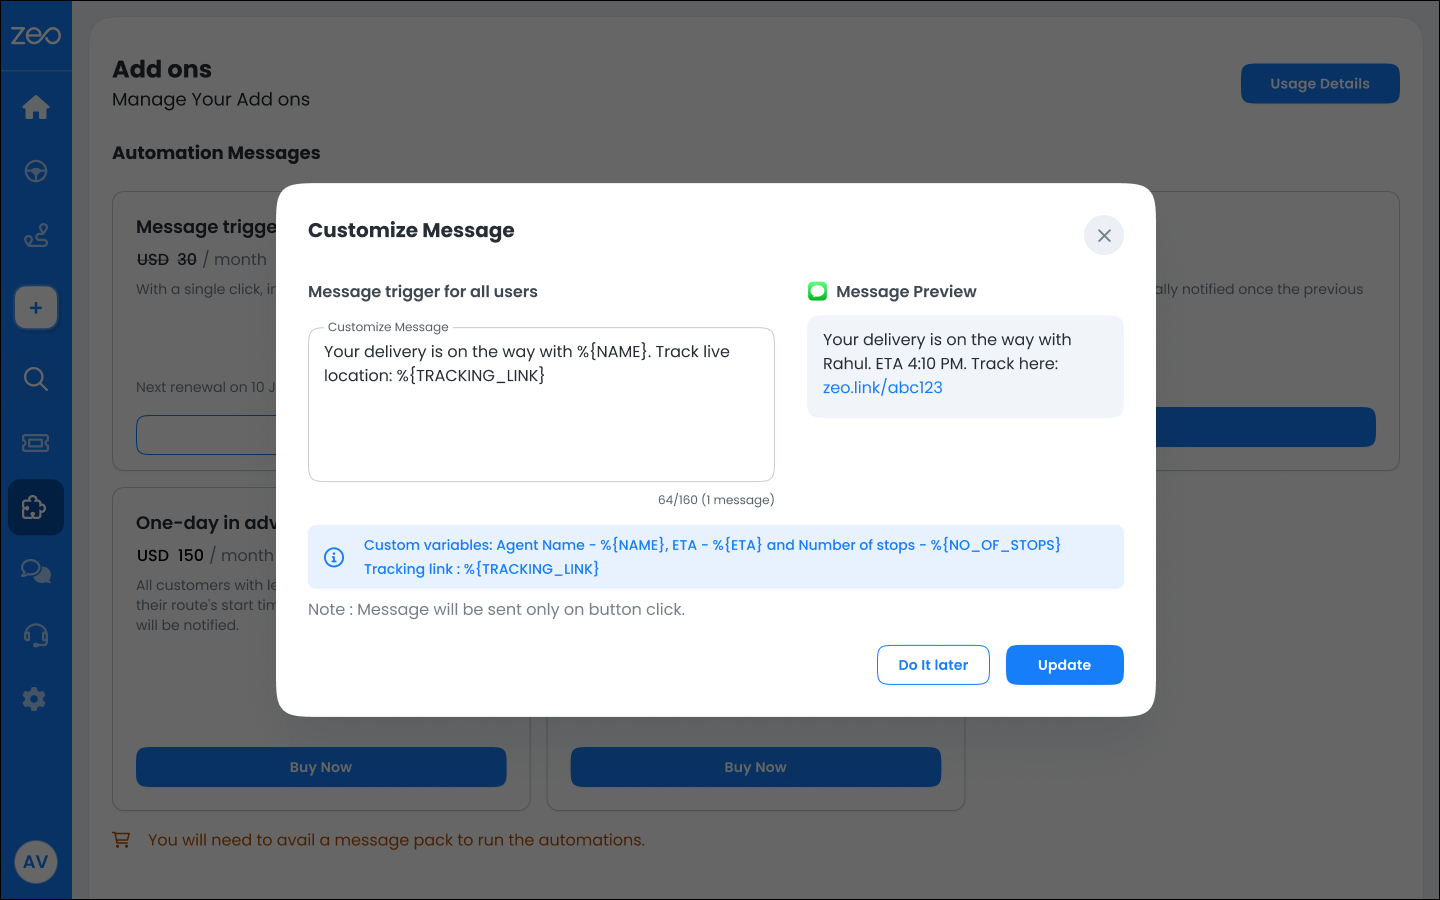
Paso 6: Haz clic en Actualizar para aplicar los cambios.
Una vez guardado, tu mensaje actualizado se utilizará para todas las notificaciones futuras de ese complemento, lo que garantiza una comunicación coherente y personalizada en todas tus entregas.
Beneficios de los complementos de notificaciones automatizadas con mensajes personalizados y específicos del sector.
1. Comunicación clara y relevante para sus clientes
Cuando tus mensajes se ajustan al contexto de tu negocio, los clientes los entienden al instante. Ya sea un pedido, una visita de servicio o una recogida, las opciones predeterminadas del sector garantizan que tu comunicación sea natural y fácil de seguir.
2. Flexibilidad para comunicarse a su manera
Con la personalización de mensajes, no te limitas a las plantillas estándar. Puedes ajustar el tono, añadir instrucciones e incluir detalles relevantes para tus operaciones. Esto te ayuda a crear un estilo de comunicación que refleje tu marca y reduzca la confusión entre tus clientes.
3. Clientes mejor preparados, menos entregas fallidas.
Cuando los clientes reciben actualizaciones claras con detalles precisos, como la fecha estimada de entrega y los enlaces de seguimiento, es más probable que estén listos a tiempo. Esto reduce los intentos de entrega fallidos y optimiza sus operaciones.
4. Reducción de las llamadas de soporte y del seguimiento.
Cuando los clientes ya tienen la información que necesitan, no tienen que llamar para solicitar actualizaciones. Los mensajes automatizados y bien estructurados resuelven la mayoría de las consultas antes de que surjan, lo que ahorra tiempo a su equipo.
5. Experiencia consistente sin esfuerzo adicional
Cada cliente recibe actualizaciones puntuales y estructuradas sin necesidad de intervención manual por su parte. Tanto si utiliza mensajes predeterminados como si los personaliza, la comunicación se mantiene coherente en todas las entregas.
6. Configuración más rápida con valores predeterminados listos para usar.
Si no desea crear mensajes desde cero, dispone de plantillas predefinidas del sector listas para usar. Esto le permite empezar rápidamente sin dejar de garantizar que su comunicación sea relevante y eficaz.
Conclusión
Los complementos de notificaciones automatizadas de Zeo Route Planner te ayudan a controlar la comunicación con tus clientes en cada etapa del proceso de entrega. Desde alertas automáticas hasta personalización de mensajes y configuraciones predeterminadas específicas del sector, todo funciona en conjunto para que tu comunicación sea clara, relevante y coherente.
En lugar de depender de actualizaciones genéricas o seguimientos manuales, puede asegurarse de que cada cliente reciba la información correcta en el momento oportuno. Esto no solo mejora la experiencia del cliente, sino que también hace que sus operaciones sean más eficientes.
Si buscas reducir la confusión, evitar entregas fallidas y ofrecer una experiencia más profesional, los complementos de notificaciones automatizadas te brindan la flexibilidad y confiabilidad necesarias para lograrlo a gran escala. Regístrate en Zeo para comenzar.
¿Es usted propietario de una flota?
¿Quiere gestionar sus conductores y entregas fácilmente?
Haga crecer su negocio sin esfuerzo con Zeo Routes Planner: optimice las rutas y administre múltiples conductores con facilidad.
aumentar el ahorro de combustible
¡Entregas y recogidas sin problemas!
Optimice rutas con nuestro algoritmo, reduciendo tiempos y costos de viaje de manera eficiente.
Empieza gratis